
-
 Dave Vinke
- Leestijd: 5 min
- Laatst geüpdatet: 07/08/2025
Detailing car models is about applying refined techniques that bring your scale model to life. The main methods are drybrushing for highlighting edges, washing for depth in details, and emphasizing panel lines. With the right tools such as fine brushes, weathering products and quality paints, you transform a basic model into a realistic miniature. These techniques are accessible for beginners and offer advanced modelers endless possibilities for perfection.
What basic techniques do you use for realistic car modeling?
The three fundamental techniques for realistic car models are drybrushing, washing and emphasizing panel lines. You use drybrushing by brushing a brush with minimal paint over raised parts, creating natural wear. You apply washes with thinned paint that remains in recesses for extra depth.
For beginners, these basic tools are essential: a set of quality brushes in different sizes, thinner for your paint type, a palette for paint mixing, and fine sandpapers from 600 to 2000 grit. Add a good primer for optimal paint adhesion, plus cotton swabs and tissues for corrections.
Advanced model builders expand their toolbox with an airbrush for smooth paint layers, special weathering sets, and precision instruments like panel line scribers. The difference between a good and a great model often lies in the preparation. Lightly sand surfaces, remove mold lines with a hobby knife, and thoroughly clean all parts before starting to paint.
The sequence of techniques is important for the best result. Always start with a good primer, then apply your base color, followed by decals. Then apply your washes for shadow work, drybrushing for highlights, and finally any weathering effects. This structure creates realistic layers that reinforce each other.
How do you apply weathering to scale models of cars?
Weathering begins with observing real cars to understand natural aging. Rust forms mainly at wheel wells and exhausts, dust collects in corners and grooves, mud splashes up from the bottom, and oil stains appear around the engine. You copy these patterns on your scale model with specific products and techniques.
For rust effects you work in layers. Start with a dark brown base color on places where water collects. Add orange accents for fresh rust, and use pigment powders for texture. For dust effects, you mix light brown or gray pigments with a drop of thinner into a paste. You apply this with a dry brush in upward movements.
You create mud effects by mixing thick paint with sand or baking soda for texture. Carefully splash this mixture on wheel wells and the bottom with an old toothbrush. For wet mud you use glossy varnish, for dry mud matte varnish. You make oil stains with black or dark brown wash that you let run from logical leak points.
The key to convincing weathering is subtlety and layering. Build up effects slowly and think about the history of your model. A rally car has different wear than a city car. Combine techniques for realism: rust under peeling paint, dust over old scratches, fresh mud over old stains. Always test first on an invisible part or practice model.
What are the best paint types and brushes for car models?
Acrylic paint is ideal for beginners because it is water-based, dries quickly and is easy to thin with water. Enamel paint gives a harder, more durable finish but requires special thinners and better ventilation. Lacquer paints offer the most authentic gloss for car models but are the most difficult to use.
For metallic effects and chrome details you need specific paint types. Metallic acrylic paints contain small metal particles that reflect light. For the best result you apply these over a glossy black background. You achieve chrome effects with special chrome pens or by airbrushing Alclad II lacquers over a high-gloss black base.
| Brush Type | Size | Use | Recommended Brand |
|---|---|---|---|
| Round | 00-2 | Details, lines | Kolinsky sable |
| Flat | 4-8 | Large areas | Synthetic |
| Fan shape | 2-4 | Drybrushing | Sturdy synthetic |
| Liner | 000-0 | Ultra-fine details | Kolinsky sable |
Mixing colors for realistic tints requires practice and patience. Start with primary colors plus white and black. For natural car paints you always add a touch of gray to bright colors. Keep a color log with your mixing ratios. For two-layer metallic effects you first mix a base color, followed by a transparent layer with metallic medium.
Airbrush techniques open new possibilities for smooth transitions and fine details. Thin your paint to the consistency of milk, usually 1:1 with thinner. Spray in thin layers at 15-20 cm distance. For color transitions you work from light to dark. Mask parts you want to protect with special masking tape or liquid masking film.
What accessories make your car model extra realistic?
Aftermarket parts elevate your model to a higher level. Realistic rubber tires with correct profiles replace the often too hard plastic examples. Photo-etch antennas and windshield wipers are much finer than molded parts. Turned metal exhausts and wheels give authentic material effects that paint cannot match.
Interior details make the difference between a model and a miniature artwork. Use flocking for carpet texture, real fabric for seat upholstery, and thin wire for seat belts. Instrument panels come to life with decals or photo-etch parts behind clear plastic. Add small accessories like road maps, sun visors or even miniature drink cans.
For realistic windows you use different techniques per glass type. You polish clear plastic with increasingly finer polishing compound to mirror shine. You make tinted glass by applying transparent paint to the inside. Add condensation with matte varnish in dots. You carefully create cracked windows with a sharp knife in spider web patterns.
License plates and stickers require precision for convincing realism. Print custom license plates on decal paper or use photo-etch versions. Apply decals on a glossy surface with decal softener for a painted look. Small details like parking stickers, inspection labels or sponsor logos tell the story of your model. Age stickers with diluted brown wash for used cars.
Where do you find the best model building products for realistic details?
Quality products for model building detailing can be found at specialized shops that carry a wide assortment. Online shops often offer the largest selection with detailed product descriptions and reviews from other model builders. Look for brands like Vallejo for paints, Tamiya for weathering products, and AK Interactive for special effects.
When assembling a complete detailing set within budget, you start with the essentials: a good primer, base colors for your project, a wash set, and quality brushes. Gradually build your collection with specific weathering products and specialty tools. Rather buy some high-quality products than many cheap alternatives.
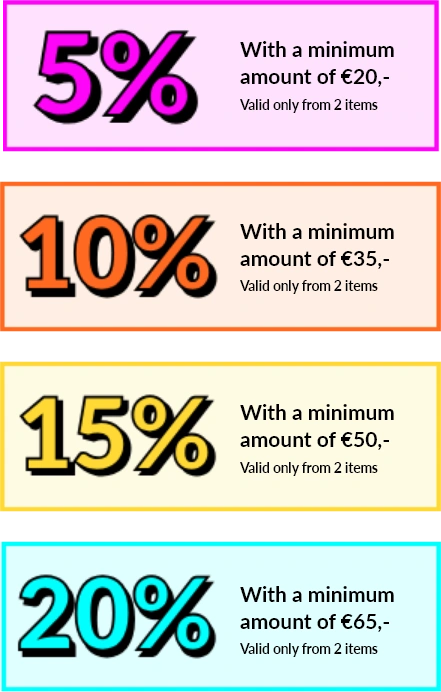
We offer in our model building collection various products that are perfect for detail work. From basic sets to advanced building kits, you’ll find everything for your hobby there. Also check our discount rules for automatic discounts on multiple items, so you can expand your detailing set advantageously.
Online communities and forums are goldmines for product tips and techniques. Share your projects, ask advice, and learn from experienced model builders. YouTube tutorials show products in action, which helps with purchase decisions. Local model building clubs often organize swap meets where you can find rare parts and vintage sets at reasonable prices.
Frequently Asked Questions
How long should I wait between different paint layers and techniques?
What are the most common mistakes when detailing car models?
How do I best store my detailed models?
Can I undo failed detailing techniques?
What order do I use for applying different types of decals?
How do I determine what detail level is suitable for my skill level?
Table of contents
Much viewed


More blogs
What are the benefits of model building as a hobby?